Chicago-Style Bakery Apple Slices
Chicago-Style Bakery Apple Slices (Easy Recipe)
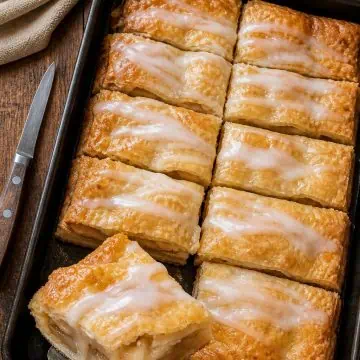
Are you craving that nostalgic, sweet aroma of a classic Midwestern corner bakery? These authentic Chicago-style bakery apple slices are the ultimate comfort dessert. Imagine a tender, flaky, buttery crust packed with warm cinnamon apples, baked to golden perfection in a jelly roll pan, and finished with a sweet vanilla glaze that hardens into a delicate crackle.
Whether you grew up in the Chicago suburbs grabbing these sweet squares in a white paper box on a Sunday morning, or you're completely new to this regional treat, this recipe is guaranteed to become a household favorite.
In this comprehensive guide, I'll walk you through exactly how to recreate this iconic dessert in your own kitchen. Let's dive into the secrets behind the ultimate Chicago bakery apple slice!
What Are Chicago-Style Bakery Apple Slices?
If you aren't from the Midwest, you might be wondering how these differ from a traditional apple pie or a Dutch apple slab pie. Chicago-style bakery apple slices are incredibly unique in their construction and texture. They were a staple in mom-and-pop bakeries across the city and suburbs, largely popularized in the mid-20th century.
Unlike a standard pie that is served in a wedge with a fork on a plate, these are baked in a rectangular jelly roll pan. The pastry is sturdier, designed specifically to be eaten by hand. It acts almost like a shortbread-pie hybrid. The filling is a dense, cinnamon-spiced apple mixture, and the absolute crowning glory is the sweet, opaque vanilla glaze spread across the top crust while it's cooling. When cut into neat squares, they are incredibly portable, making them the perfect potluck dessert or on-the-go breakfast pastry.
Why You Will Fall in Love with This Recipe
There is a reason these apple slices have stood the test of time. Here is exactly why this recipe works so flawlessly:
- Crowd-Pleasing Yield: Baking in a 9x13 jelly roll pan means you get up to 15 generous slices, perfect for feeding a crowd without the hassle of making multiple round pies.
- Incredibly Forgiving Dough: Unlike finicky traditional pie crusts that require absolute precision, this dough is meant to be patched. If it tears while you are transferring it to the pan, simply press the seams together with your fingers. The glaze hides all imperfections!
- The Perfect Flavor Balance: The slight tartness of the apples balances beautifully against the rich, savory pastry crust and the sweet vanilla glaze.
- Travel-Friendly: These slices hold their shape beautifully. They won't fall apart in a lunchbox, on a dessert table, or during a car ride.
Key Ingredients and Substitutions
To achieve that authentic bakery flavor and texture, we are relying on pantry staples. Here is what you need to gather.
For the Sturdy Pastry Crust
- All-Purpose Flour: Provides the right amount of structure without making the pastry tough.
- Fat (Butter and Shortening): Traditional old-school bakeries swore by lard or shortening for a tender, flaky bite that doesn't crumble in your hands. Using a 50/50 blend of high-quality unsalted butter and shortening gives you the best of both worlds: the rich, authentic flavor of butter and the structural integrity of shortening.
- Ice Water & Lemon Juice: The acid in a splash of lemon juice tenderizes the gluten strands, while ice water keeps the fats completely solid before hitting the hot oven.
- Egg Yolks: A secret ingredient in many vintage bakery doughs. Egg yolks add a beautiful richness and a gorgeous golden hue to the baked pastry.
For the Apple Filling
- Apple Pie Filling: For the true, fast bakery shortcut, two cans (about 32 ounces total) of high-quality store-bought apple pie filling work wonders.
- Fresh Apple Alternative: If you prefer a from-scratch filling, you will need about 3 pounds of peeled, thinly sliced baking apples (like Granny Smith or Jonagold). Simmer them briefly on the stove with 1 cup of granulated sugar, 2 tablespoons of cornstarch, 1 teaspoon of cinnamon, and ¼ cup of water until deeply thickened. Let cool completely before using.
For the Vanilla Bakery Glaze
- Powdered Sugar: Also known as confectioners' sugar, this forms the smooth, lump-free base of the icing.
- Softened Butter: Adds a creamy, rich mouthfeel to the glaze.
- Whole Milk: Thins the glaze to the perfect spreadable consistency.
- Pure Vanilla Extract: Do not skip this! It provides that signature, intoxicating bakery aroma.
Essential Kitchen Tools
Before you begin, ensure you have the right equipment ready to go:
- 9x13-inch Jelly Roll Pan: This is crucial. A standard casserole dish is too deep; you want the shallow edges of a jelly roll or quarter-sheet pan to get the perfect crust-to-filling ratio.
- Pastry Blender: Essential for cutting the cold fat into the flour efficiently without melting it with your warm hands.
- Offset Spatula: The absolute best tool for spreading the sticky apple filling and swooping the final glaze evenly across the top.
Expert Pro-Tips for the Best Results
To ensure your Chicago-style bakery apple slices turn out flawlessly every single time, keep these professional baking tips in mind:
- Keep Ingredients Freezing Cold: The secret to a flaky crust is cold fat. If your kitchen is warm, pop your mixing bowl and your cubed butter into the freezer for 10 minutes before starting.
- The Rolling Pin Trick: Transferring a large rectangular sheet of dough can be tricky. Lightly dust your rolling pin with flour, roll the dough loosely around the pin, and gently unroll it directly over the pan.
- Wait to Slice: It is incredibly tempting to cut into these while they are hot and smelling amazing, but patience is key. Let them cool completely so the fruit filling sets and the glaze hardens. This ensures you get those perfect, clean, bakery-style square cuts.
Storage and Freezing Instructions
- Room Temperature: These apple slices can be safely stored at room temperature for up to 2 days. Simply cover the pan loosely with aluminum foil, or place the cut squares in an airtight container separated by parchment paper.
- Refrigerator: To extend their shelf life, store them in an airtight container in the fridge for up to 5 days. They are incredibly delicious served chilled with a cup of coffee!
- Freezing: These freeze beautifully. Cut the completely cooled pastry into individual squares. Flash freeze the squares on a baking sheet for 1 hour, then transfer them to a freezer-safe zip-top bag, separating layers with wax or parchment paper. Freeze for up to 3 months. Thaw overnight in the refrigerator or on the counter before serving.
Frequently Asked Questions (FAQ)
Can I use store-bought pie crust? Yes! If you are short on time, you can absolutely use two boxes (4 rolls total) of refrigerated pie crust. You will need to unroll them, overlap the edges slightly, and use a rolling pin to fuse them together into a large rectangle to fit your sheet pan.
Can I use different fruit fillings? Absolutely. This foundational pastry recipe works beautifully with cherry pie filling, blueberry filling, or even peach. The original Chicago bakeries often had an entire display case with different fruit variations of these exact slices.
Why did my bottom crust get soggy? A soggy bottom usually means the oven wasn't hot enough, or the pan was placed too high up in the oven. Baking at 400°F ensures the bottom crust crisps up quickly. You can also bake the pan on the lower-middle rack to encourage a crisper, perfectly baked bottom layer.
Chicago-Style Bakery Apple Slices
Ingredients
- For the Pastry Dough:
- 2 ½ cups all-purpose flour
- ½ teaspoon baking powder
- ½ teaspoon kosher salt
- ½ cup unsalted butter very cold and cubed (1 stick)
- ½ cup vegetable shortening or lard, very cold
- 2 large egg yolks
- 1 tablespoon fresh lemon juice
- ⅓ cup ice water plus 1-2 tablespoons more if needed
- For the Apple Filling:
- 32 ounces canned apple pie filling about 4 cups
- For the Vanilla Glaze:
- 1 ½ cups powdered sugar
- 3 tablespoons unsalted butter softened
- 1 teaspoon pure vanilla extract
- 2 to 3 tablespoons whole milk
Instructions
- Prepare the Dry Ingredients: In a large mixing bowl, whisk together the all-purpose flour, baking powder, and kosher salt.
- Cut in the Fat: Add the cold, cubed butter and the cold shortening to the bowl. Using a pastry blender or two forks, cut the fats into the flour until the mixture resembles coarse peas.
- Mix the Wet Ingredients: In a small measuring cup, lightly whisk together the egg yolks, fresh lemon juice, and ice water.
- Form the Dough: Pour the wet mixture over the flour and gently toss with a fork until the dough just begins to pull together. Do not overmix. Divide the dough into two equal halves, flatten them into thick rectangles, wrap tightly in plastic wrap, and chill in the refrigerator for at least 30 minutes.
- Preheat and Prep: Preheat your oven to 400°F (200°C). Have an ungreased 9x13-inch jelly roll pan ready.
- Roll the Bottom Crust: On a well-floured surface, roll one half of the chilled dough into a rectangle slightly larger than your pan. Gently transfer the dough to the pan, pressing it lightly into the bottom and slightly up the sides. Patch any tears with your fingers.
- Add the Filling: Spread the apple pie filling in an even layer over the bottom crust, pushing it all the way to the corners using an offset spatula.
- Add the Top Crust: Roll out the second half of the dough to the same rectangular size. Carefully drape it over the apple filling. Pinch the top and bottom crust edges together to seal. Cut 5 to 6 small slits in the top crust with a sharp knife to allow steam to escape.
- Bake: Bake on the center rack for 35 to 40 minutes, rotating the pan halfway through, until the top crust is a beautiful, deep golden brown. Remove from the oven and place on a wire rack.
- Make the Glaze: While the pastry is cooling, whisk together the powdered sugar, softened butter, vanilla extract, and milk until completely smooth. Add the milk one tablespoon at a time until you reach a smooth, spreadable consistency.
- Glaze and Cool: While the pastry is still slightly warm (but not burning hot), pour the glaze over the top and spread it evenly edge-to-edge.
- Slice and Serve: Let the pastry cool completely so the glaze hardens and sets. Slice into squares and enjoy!