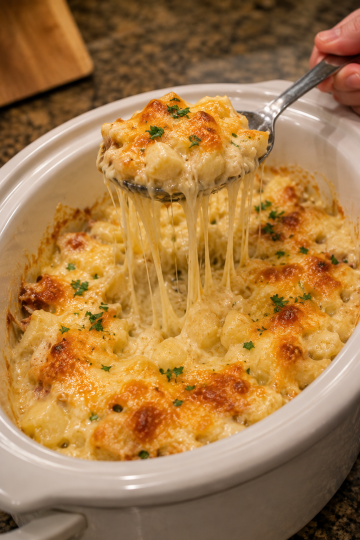
Cheesy Corn Pudding

This 4-ingredient Cheesy Corn Pudding is one of those cozy, no-fuss dishes that feels like it came straight out of a church potluck or a small-town family reunion. It's a simple, Midwestern-style comfort bake: sweet corn folded into a creamy, custard-like base with just enough cheese to give it a golden, bubbly top.
Here is the recipe for 4-Ingredient Corn Pudding, formatted and organized for your blog, using the text you provided:
🌽 4-Ingredient Cheesy Corn Pudding
🛒 Ingredients
- 2 cups canned or frozen corn kernels (if frozen, thaw and drain well)
- 1 ½ cups shredded cheese (mild cheddar, Colby Jack, or your favorite melty cheese)
- 2 cups half-and-half or whole milk
- 4 large eggs
- Optional: ½ teaspoon salt and ¼ teaspoon black pepper for seasoning (not counted in the core 4 ingredients)
- Butter or nonstick spray for greasing the baking dish
👩🍳 Directions
- Preheat: Preheat your oven to 350°F (175°C). Lightly grease a round 9-inch ceramic baking dish (or similar 2-quart casserole) with butter or nonstick spray. This helps the pudding release easily and gives the edges a nice, tender crust.
- Whisk Base: In a medium bowl, whisk the eggs until they are well blended and slightly frothy. Add the half-and-half or whole milk and whisk again until smooth. If you're using salt and pepper, whisk them in now so the seasoning is evenly distributed.
- Combine: Stir in the corn kernels and about 1 cup of the shredded cheese, reserving the remaining ½ cup of cheese for the top. Gently fold everything together so the corn and cheese are evenly mixed into the custard base.
- Assemble: Pour the mixture into the prepared baking dish, spreading the corn out so it's evenly distributed. Sprinkle the remaining ½ cup of cheese over the top, making sure to cover the surface fairly evenly so you get that pretty, golden, bubbly finish.
- Bake: Place the dish on the middle rack of the oven and bake for 40-50 minutes, or until the pudding is set around the edges and just slightly wobbly in the center. The top should be a glossy golden brown with small bubbles and a few faint cracks. If you gently insert a knife or toothpick near the center, it should come out mostly clean, with just a bit of creamy moisture.
- Rest & Serve: Remove the dish from the oven and let the pudding rest for about 10-15 minutes before serving. This short rest helps it finish setting so you can scoop out neat, custardy servings. Serve warm, straight from the baking dish, with a big spoon at the table so everyone can help themselves.
💡 Variations & Tips
- For Picky Eaters: Stick with a mild cheese like mild cheddar or Colby Jack and skip any extra seasonings beyond a little salt-kids tend to love the simple, sweet corn flavor.
- Add Nutrition: If you'd like a little more color and nutrition, fold in a handful of finely chopped bell pepper or a small handful of thawed peas along with the corn (just remember this will technically add ingredients).
- Texture: For a slightly firmer, more casserole-like texture, you can add ¼ cup of fine, plain breadcrumbs or crushed saltine crackers to the mixture before baking; it helps the pudding hold its shape when scooped.
- Richness: If you prefer a richer, more indulgent pudding, use half cream and half milk instead of all milk.
- Flavor Twist: For a bit of a grown-up twist, try swapping part of the cheese for a sharper variety like sharp cheddar or smoked Gouda and add a pinch of paprika or garlic powder.
- Individual Servings: To make individual servings, divide the mixture among greased ramekins and reduce the baking time to about 25-30 minutes, watching for the same golden top and slight wobble in the center.
- Leftovers: Leftovers reheat nicely in the oven or microwave-just cover them so the pudding doesn't dry out, and enjoy within 2-3 days.