Creamed Chipped Beef Cheese Ball

Creamed Chipped Beef Cheese Ball
When it comes to classic, crowd-pleasing party appetizers, few things can rival the savory, creamy perfection of a traditional Creamed Chipped Beef Cheese Ball. Whether you are hosting a holiday gathering, a game-day watch party, or simply need a quick bring-along dish for a family potluck, this recipe is a guaranteed hit.
Bringing together the rich tang of cream cheese, the smoky, salty bite of dried beef, and a perfect blend of savory seasonings, this appetizer tastes like pure nostalgia. The best part? It requires zero cooking, takes only minutes to prepare, and tastes even better when made ahead of time.
In this post, we will walk you through exactly how to make the best chipped beef cheese ball, complete with expert tips, storage instructions, and creative serving ideas to make your appetizer spread unforgettable.
Why You Will Love This Classic Appetizer
- Incredibly Quick to Prepare: With only a handful of ingredients and about 10 minutes of active prep time, you can have this chilling in the fridge while you focus on other dishes.
- Make-Ahead Friendly: Cheese balls are actually better when made in advance. Giving the ingredients time to mingle in the refrigerator deepens the flavor profile significantly.
- Budget-Friendly: You do not need expensive artisan cheeses or rare spices for this recipe. It relies on accessible, affordable pantry staples.
- Highly Customizable: While this classic recipe is fantastic on its own, it serves as a wonderful base for your own culinary twists, such as adding chopped pecans or a dash of hot sauce.
What is Chipped Dried Beef?
If you have never cooked with chipped dried beef before, you are in for a treat. Chipped beef is essentially beef that has been partially dried, salted, and pressed into thin, flexible slices. It is most famously known for its role in creamed chipped beef on toast (a classic mid-century comfort food), but its intense, salty, umami flavor makes it an incredible secret weapon in dips and appetizers.
You can usually find chipped beef in the grocery store aisle near the canned meats (like tuna and chicken) or occasionally in the refrigerated deli section. Because it is cured and salted, it brings a massive punch of flavor to the mild cream cheese base.
Key Ingredients and Substitutions
To make this delicious appetizer, you only need a few simple ingredients. Here is what you need to gather:
- Cream Cheese: You will need two 8-ounce blocks. Crucial tip: Ensure your cream cheese is completely softened to room temperature before you begin. This guarantees a smooth, lump-free cheese ball that mixes effortlessly. Full-fat cream cheese provides the best texture, but you can use reduced-fat if preferred.
- Chipped Dried Beef: One 8-ounce package, finely chopped. Pro-Tip: Dried beef is naturally very salty. If you are sensitive to sodium, you can briefly rinse the beef under cold water and pat it completely dry with paper towels before chopping.
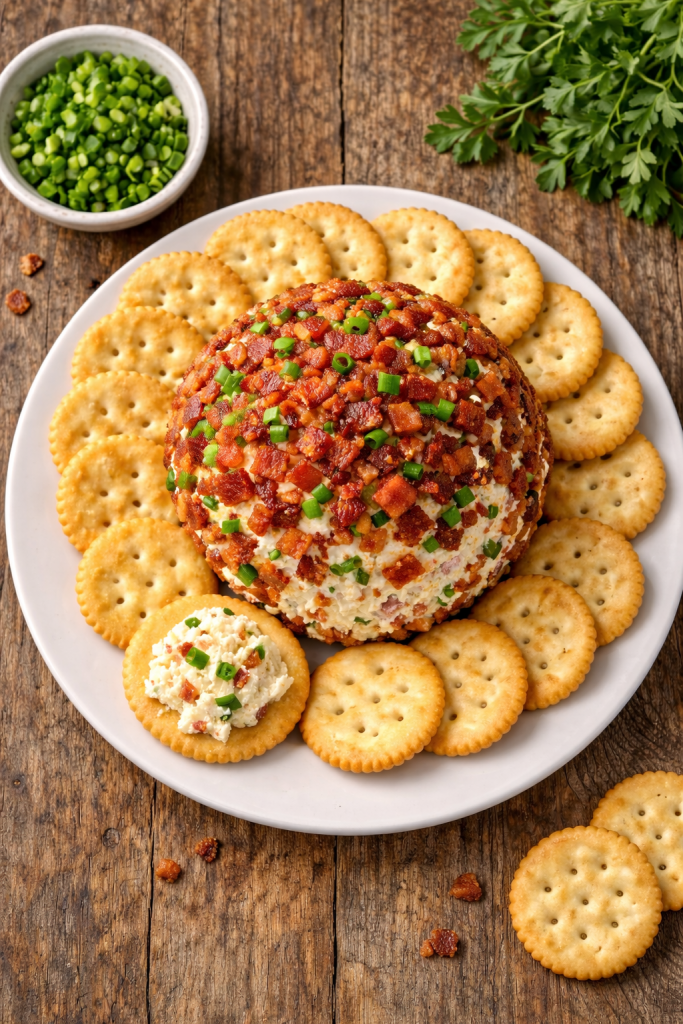
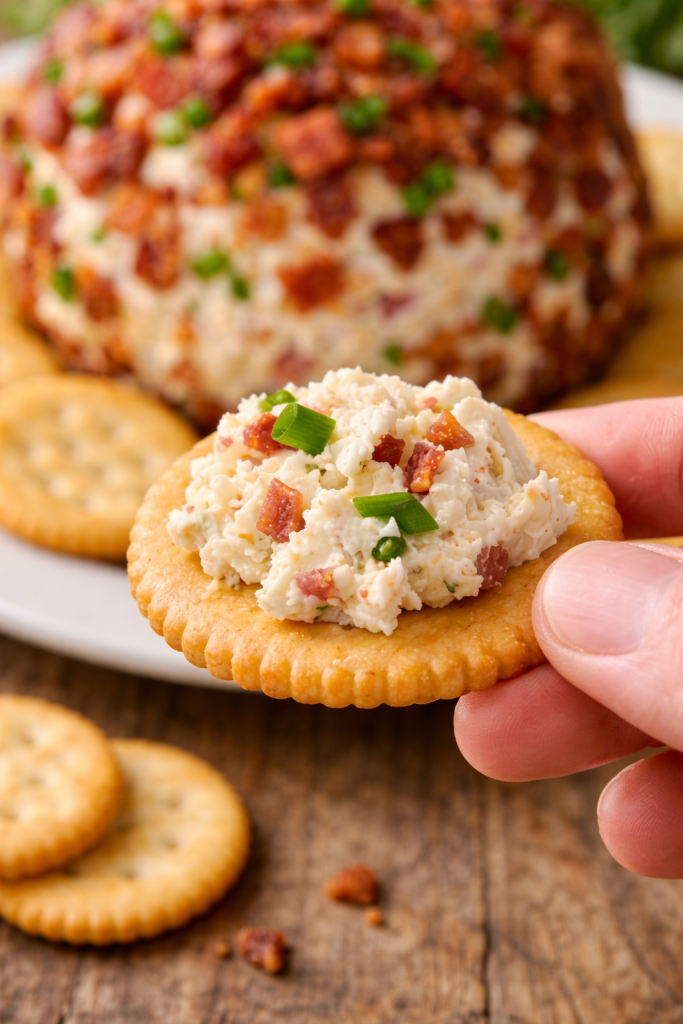
- Green Onions: Three stalks, finely chopped. These provide a much-needed fresh, crisp bite that cuts through the richness of the cheese and meat. Save a little extra for garnishing the outside!
- Worcestershire Sauce: Just 1 ½ teaspoons adds a complex, tangy depth of flavor that elevates the whole dish.
- Seasonings (Garlic & Onion Powder): A half teaspoon of each reinforces the savory notes without adding the harsh bite of raw garlic or onions.
- Salt: Use this very sparingly. Because the dried beef and Worcestershire sauce already contain significant sodium, you should only add extra salt after you have tasted the mixed base.
Step-by-Step Instructions
Creating this appetizer is incredibly straightforward. Here is how to build the perfect cheese ball:
1. Soften and Prep Start by placing your softened cream cheese into a large mixing bowl. Take a few minutes to finely chop your chipped beef and green onions. The finer you chop them, the easier the cheese ball will be to scoop with a cracker later.
2. Mix the Base Using a sturdy wooden spoon or a hand mixer on medium speed, beat the cream cheese until it is smooth and creamy. Add in the finely chopped chipped beef and green onions, mixing until they are evenly distributed throughout the cheese.
3. Add the Seasonings Pour in the Worcestershire sauce, garlic powder, and onion powder. Mix thoroughly. At this stage, take a small taste. If you feel it needs more salt, add a tiny pinch, but remember that the flavors will intensify as it chills.
4. Shape the Cheese Ball Lay a large sheet of plastic wrap flat on your counter. Transfer the cream cheese mixture directly into the center of the plastic wrap. Gather the corners of the plastic wrap, pull them up together, and gently twist. Use your hands to massage and shape the wrapped mixture into a neat, uniform ball.
5. Chill and Firm Place the wrapped cheese ball in the refrigerator. It needs to chill for at least 20 minutes to firm up enough to hold its shape, but chilling it for 2 to 24 hours is highly recommended for the best flavor and texture.
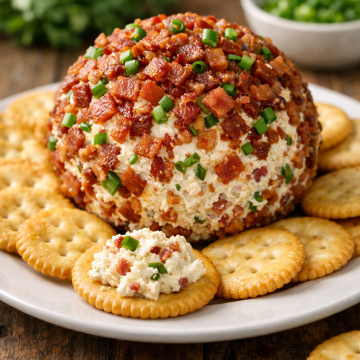
What to Serve with Your Cheese Ball
A great dip needs a great vessel. While classic Ritz crackers are the traditional and arguably the most delicious pairing due to their buttery crunch, providing a variety of dippers makes your appetizer platter visually appealing and accommodates different dietary needs.
- Crackers: Ritz, Wheat Thins, Triscuits, or water crackers.
- Breads: Toasted baguette slices, bagel chips, or mini pita breads.
- Fresh Vegetables: Celery sticks, carrot sticks, bell pepper strips, and cucumber slices are excellent low-carb, gluten-free options that pair beautifully with the rich beef dip.
- Pretzels: Pretzel crisps or thick pretzel sticks offer a fantastic crunch.
Make-Ahead and Storage Instructions
How to Store: Keep any leftover cheese ball tightly wrapped in plastic wrap or placed in an airtight container in the refrigerator. It will stay fresh and delicious for up to 5-7 days.
Can You Freeze a Cheese Ball? Yes, you can! Cream cheese can sometimes change texture slightly when frozen, becoming a bit crumbly, but it works well in a pinch. Wrap the un-garnished cheese ball tightly in two layers of plastic wrap and a layer of aluminum foil. Freeze for up to 1 month. Thaw it completely in the refrigerator overnight before serving.
Frequently Asked Questions (FAQs)
Can I roll the outside of the cheese ball in anything? Absolutely! While this recipe keeps it simple, rolling the finished, chilled cheese ball in chopped toasted pecans, walnuts, or extra chopped green onions adds a beautiful presentation and a wonderful textural crunch.
How do I soften cream cheese quickly? If you forgot to take your cream cheese out of the fridge, leave it in its foil wrapping and submerge it in a bowl of warm (not hot) water for about 10-15 minutes. Alternatively, unwrap it, place it on a microwave-safe plate, and microwave on 30% power for 15-20 seconds.
Can I make this into a warm dip instead? Yes! If you prefer a hot dip, spread the mixed ingredients into a small baking dish, top with a handful of shredded cheddar or gruyere cheese, and bake at 350°F (175°C) for 20 minutes until bubbly and golden.
Creamed Chipped Beef Cheese Ball
Ingredients
- 2 8 oz. packages cream cheese, softened to room temperature
- 1 8 oz. package chipped dried beef, finely chopped
- 3 stalks green onion finely chopped (plus extra for garnish)
- 1 ½ teaspoons Worcestershire sauce
- ½ teaspoon garlic powder
- ½ teaspoon onion powder
- Salt to taste (taste before adding!)
- Ritz crackers or preferred dippers for serving
Instructions
- Prep the Base: Place the softened cream cheese in a large mixing bowl. Using an electric hand mixer or a sturdy wooden spoon, beat the cream cheese until completely smooth.
- Combine Ingredients: Add the finely chopped chipped dried beef and green onions to the bowl. Mix until the ingredients are well incorporated.
- Season: Add the Worcestershire sauce, garlic powder, and onion powder to the mixture. Stir well to combine. Taste the mixture carefully-if you feel it needs more sodium, add a small pinch of salt, keeping in mind the beef is naturally salty.
- Shape: Lay a large piece of plastic wrap flat on your work surface. Spoon the cream cheese mixture into the center of the wrap. Pull the edges of the plastic wrap up and twist them together, using your hands on the outside of the plastic to mold the mixture into a round ball.
- Chill: Place the tightly wrapped cheese ball into the refrigerator. Chill for a minimum of 20 minutes to allow it to firm up. For the best flavor development, chill for 2 hours or overnight.
- Serve: When ready to serve, unwrap the cheese ball and place it on a serving platter. Garnish the top with additional finely chopped green onions if desired. Serve chilled alongside Ritz crackers, vegetables, or your favorite dipping snacks. Enjoy!
Notes
- Storage: Keep leftovers wrapped tightly in the refrigerator for up to one week.
- Customization: Roll the finished cheese ball in toasted, chopped pecans or walnuts just before serving for an elegant presentation and added crunch.